티스토리 뷰
GitHub 프로필은 나의 개발 역량을 한눈에 보여줄 수 있는 중요한 공간입니다. 이 글에서는 GitHub 메인 화면에 자신을 효과적으로 소개하는 방법을 알아보겠습니다.
1. 저장소생성
- 본인의 깃허브 아이디와 같은 이름으로 저장소를 생성합니다.
- special repository 문구를 확인 후, "Add a README file"를 체크합니다.

2. 수정


- 위 화면은 기본으로 작성되어 있는 화면으로, 본인의 스타일대로 수정하시고, "Commit changes..."를 클릭하시면 적용이 됩니다.
3. 예시
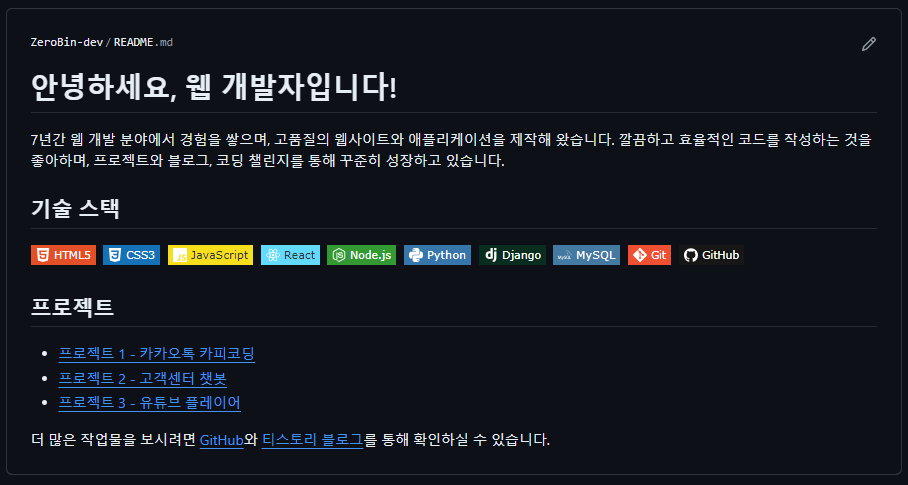
<h1>안녕하세요, 웹 개발자입니다!</h1>
<p>
7년간 웹 개발 분야에서 경험을 쌓으며, 고품질의 웹사이트와 애플리케이션을 제작해 왔습니다.
깔끔하고 효율적인 코드를 작성하는 것을 좋아하며, 프로젝트와 블로그, 코딩 챌린지를 통해
꾸준히 성장하고 있습니다.
</p>
<h2>기술 스택</h2>
<p>
<img src="https://img.shields.io/badge/Java-007396?style=flat-square&logo=Java&logoColor=white"/> 
<img src="https://img.shields.io/badge/Spring-6DB33F?style=flat-square&logo=Spring&logoColor=white"/> 
<img src="https://img.shields.io/badge/HTML5-E34F26?style=flat-square&logo=HTML5&logoColor=white"/> 
<img src="https://img.shields.io/badge/CSS3-1572B6?style=flat-square&logo=CSS3&logoColor=white"/> 
<img src="https://img.shields.io/badge/JavaScript-F7DF1E?style=flat-square&logo=JavaScript&logoColor=white"/> 
<img src="https://img.shields.io/badge/jQuery-0769AD?style=flat-square&logo=jQuery&logoColor=white"/> 
<img src="https://img.shields.io/badge/Node.js-339933?style=flat-square&logo=Node.js&logoColor=white"/> 
<img src="https://img.shields.io/badge/Vue.js-4FC08D?style=flat-square&logo=Vue.js&logoColor=white"/> 
<img src="https://img.shields.io/badge/Thymeleaf-005F0F?style=flat-square&logo=Thymeleaf&logoColor=white"/> 
<img src="https://img.shields.io/badge/Oracle-F80000?style=flat-square&logo=Oracle&logoColor=white"/> 
<img src="https://img.shields.io/badge/Redis-DC382D?style=flat-square&logo=Redis&logoColor=white"/> 
<img src="https://img.shields.io/badge/MariaDB-003545?style=flat-square&logo=MariaDB&logoColor=white"/> 
<img src="https://img.shields.io/badge/MySQL-4479A1?style=flat-square&logo=MySQL&logoColor=white"/> 
<img src="https://img.shields.io/badge/Git-F05032?style=flat-square&logo=Git&logoColor=white"/> 
<img src="https://img.shields.io/badge/SVN-809CC9?style=flat-square&logo=subversion&logoColor=white"/> 
<img src="https://img.shields.io/badge/Kotlin-7F52FF?style=flat-square&logo=Kotlin&logoColor=white"/> 
<img src="https://img.shields.io/badge/Nginx-009639?style=flat-square&logo=Nginx&logoColor=white"/> 
<img src="https://img.shields.io/badge/Linux-FCC624?style=flat-square&logo=Linux&logoColor=white"/> 
<img src="https://img.shields.io/badge/Apache-D22128?style=flat-square&logo=Apache&logoColor=white"/> 
<img src="https://img.shields.io/badge/Docker-2496ED?style=flat-square&logo=Docker&logoColor=white"/> 
<img src="https://img.shields.io/badge/NGINX-009639?style=flat-square&logo=nginx&logoColor=white"/> 
<img src="https://img.shields.io/badge/CI/CD-00A3E0?style=flat-square&logo=ci&logoColor=white"/> 
</p>
<h2>프로젝트</h2>
<ul style="list-style: none; padding: 0;">
<li><a href="https://github.com/ZeroBin-dev/MYMSG_BE">프로젝트 1 - 카카오톡 카피코딩</a></li>
<li><a href="https://github.com/ZeroBin-dev/CusCenBot">프로젝트 2 - 고객센터 챗봇</a></li>
<li><a href="https://github.com/ZeroBin-dev/YoutubePlayerWithKS">프로젝트 3 - 유튜브 플레이어</a></li>
</ul>
<p>
더 많은 작업물을 보시려면 <a href="https://github.com/ZeroBin-dev">GitHub</a>와
<a href="https://zerobin-dev.tistory.com/">티스토리 블로그</a>를 통해 확인하실 수 있습니다.
</p>
- commit 후, 메인페이지로 접속하면 자기소개서 화면을 한눈에 확인할 수 있습니다.
4. 기술스택태그 생성방법
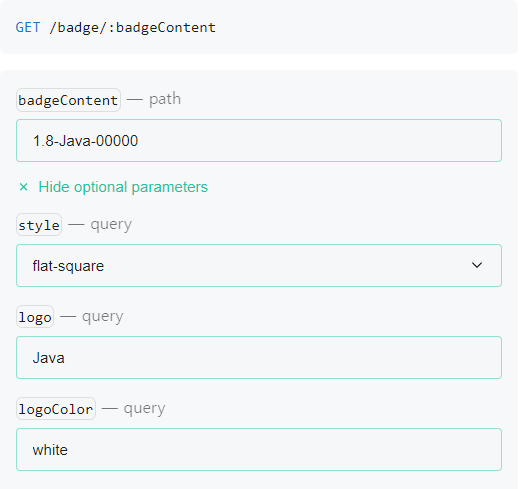
- https://shields.io/badges 접속
- 우측 "+Show optional parameter"를 클릭하여 원하는 모양을 만들고
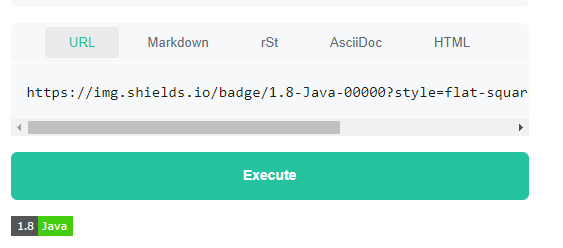
- "Execute" 버튼을 클릭하여 Badge 를 생성합니다.


- badgeContent 에는 <label>-<message>-<color> 순으로 입력합니다.

- "Execute" 버튼을 클릭하면 URL 이 생성되고, img 태그 src 속성에 작성하시면 됩니다.
감사합니다.
'도구 및 환경 > Git' 카테고리의 다른 글
| [Git] Git 과 SVN 의 차이점 (2) | 2024.12.03 |
|---|---|
| [Git] Git-flow 브랜치 전략 간단한 소개 (0) | 2024.11.04 |
| [Gitlab] Fork-MergeRequest 전략 (2) | 2024.06.04 |
| [Gitlab] Access Token 발급받기 (2) | 2024.05.20 |
| [Git] SourceTree 설치 및 사용방법 (1) | 2024.05.16 |
최근에 올라온 글
- Total
- Today
- Yesterday
